
You want a bedroom that looks tidy, works hard, and holds its value. I focus on layouts that turn dead space into storage that feels built for the room. The ideas here come from plans that save time each morning, keep dust out of sight, and create a calm look.
If you are exploring a built in wardrobe nz option, start with reach-in layouts that deliver strong function without taking floor area. I will break down what to include, how to plan it, and why Kitset Wardrobes is a smart pick in New Zealand.
Why Built-ins Add Real Value
A good reach-in wardrobe turns one wall into a zone for hanging, folding, shoes, and accessories. That means less furniture in the room and a cleaner line of sight.
Buyers notice:
- A tidy front with sliding or bifold doors
- A layout that uses the full height and width
- A system that can adapt as needs change
Built in wardrobes NZ wide often fetch strong interest in listings because they signal care, planning, and low waste of space.
Start With Purpose, Then Set the Layout
Begin with what you own and how you dress. I ask three things:
1. How much short hang and long hang do you need?
2. How many drawers for daily use versus deep storage?
3. How many pairs of shoes need spots you can reach fast?
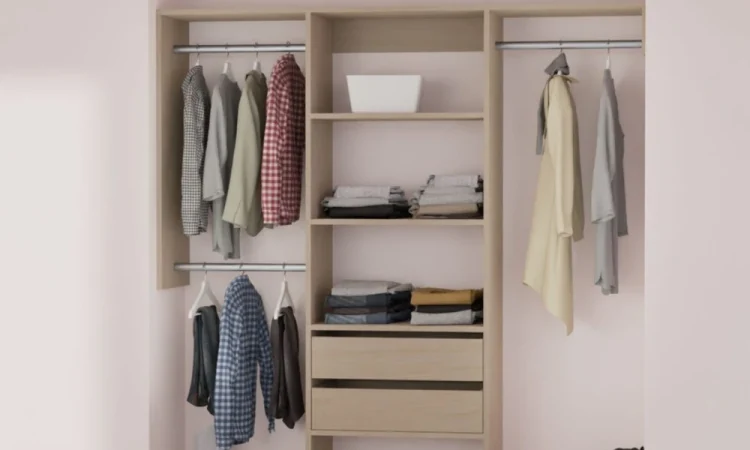
- A center tower with drawers and shelves for folded items
- Double hang sections for shirts and pants
- One long hang bay for coats and dresses
- Top shelf across the span for luggage and off-season bins
This base plan suits reach in wardrobes in most NZ bedrooms and forms a clean, balanced look.
Door Choices That Save Space
- Sliding doors fit tight rooms and keep traffic clear.
- Bifold doors open the full width, which helps during resets.
- Full-height panels hide clutter and make the room feel larger.
Match door style with your wall width and bed position. Quiet tracks and solid panels matter in daily use.
Smart Components That Lift Daily Flow
For built in wardrobe storage that works day after day, use a simple mix:
- Drawer tower at waist height for T-shirts, socks, and small items
- Adjustable shelves for jumpers and bags
- Pull-out shoe trays for the bottom third
- Tie or belt rack near the mirror line
- Valet hook near the opening for next-day outfits
A built in wardrobe organiser should group items by use and height. Keep grab-and-go gear between knee and shoulder. Place seldom-used items high.
Ideas For Different Users
- Couples: Mirror the left and right sides. Share the center drawer tower. Use two top bins labeled by person.
- Kids: Increase shelves, reduce long hang, add deep drawers. Leave floor space for crates.
- Guests: More open shelves, fewer drawers, one long hang bay with spare hangers.
These small shifts make wardrobe storage solutions NZ homeowners can fine tune over time.
Materials, Finish, and Fit
Choose neutral finishes that suit most styles. White, light oak, or soft grey age well and help with resale. Use full-height towers for a built-in look. Fit top shelves close to the ceiling to cut dust and visual gaps.
Lighting and Power
Good light changes the feel of any wardrobe:
- LED strip or sensor light inside the cavity
- A small surface light above the opening
- One outlet nearby for a steamer or lint shaver
Plan wiring before you close the cavity. A clean face with light inside reads as more premium.
Why I Recommend Kitset Wardrobes
Kitset Wardrobes offers reach-in and walk-in wardrobe systems that fit real NZ bedrooms. They keep costs in check with flat-pack kits and a modular approach, yet still allow tailored layouts. Oversized shelves and rails trim to size during install, which helps in older homes with uneven walls.
They stand out for:
- A wide range of wardrobe systems NZ buyers can mix and match
- An online 3D planner that helps you test layouts
- Fast dispatch and nationwide delivery
- Clear instructions for DIY with basic tools
- Options for full kits or individual parts to build custom wardrobe systems
If you want a wardrobe organiser NZ homeowners can install without trade crews, their kits make that path clear while keeping quality front and center.
Planning Steps You Can Follow
1. Measure width, height to ceiling, and depth at three points.
2. Note skirting boards, switches, windows, and doors.
3. List clothing by type, then count hangers and shoes.
4. Choose door style based on room layout.
5. Pick a tower width that leaves even hang bays on both sides.
6. Set drawer heights for the items you fold most.
7. Add one feature: pull-out shoes, a pants rack, or a valet hook.
8. Plan lighting and one power point.
9. Confirm fit with a planner tool or a quote from the supplier.
10. Order, assemble, and trim rails and top shelves to finish the fit.
Budget Tips Without Cutting Quality
- Prioritize drawers and double hang first.
- Use adjustable shelves over too many specialty inserts.
- Keep finishes simple and consistent.
- Add accessories in stages after the core is in place.
This approach gives a strong base now and room to upgrade later.
Make It Happen
A well-planned reach-in is the fastest way to add function and polish to a bedroom. Start with a clear list of needs, choose a balanced layout, and keep the front as calm as the interior is organized. If you want a flexible built in wardrobe organiser that fits NZ homes, Kitset Wardrobes offers a practical path with custom options, clear planning tools, and parts that fit the space you have.